
How to Set Up a Small Hydroponic Kit at Home
Contents
- 1 How to Set Up a Small Hydroponic Kit at Home
- 1.1 What Is Hydroponics?
- 1.2 Why Choose a Small Hydroponic Kit?
- 1.3 Step 1: Choose the Right Hydroponic System
- 1.4 Step 2: Gather Your Equipment
- 1.5 Step 3: Choose the Right Location
- 1.6 Step 4: Assemble the Kit
- 1.7 Step 5: Mix and Balance Nutrients
- 1.8 Step 6: Plant Your Seeds or Seedlings
- 1.9 Step 7: Maintain Your System
- 1.10 Common Beginner Mistakes to Avoid
- 1.11 Is Hydroponics Worth It?
- 1.12 Final Thoughts on Setting Up a Small Hydroponic Kit at Home
- 1.13 How Do Automated Hydroponic Systems Work?
- 1.14 Deep Water Culture Hydroponic Systems (DWC):
- 1.15 The Kratky Hydroponic Method Explained
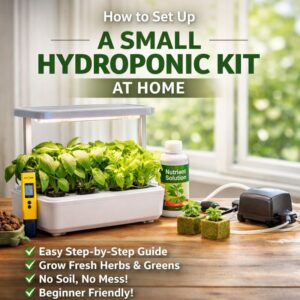 A Hydroponic kit is one of the easiest and most rewarding ways to grow fresh herbs and vegetables at home—no soil required. Whether you live in an apartment, a townhouse, or want a clean and efficient way to grow food indoors, a small hydroponic kit is an excellent starting point.
In this guide, we’ll walk through exactly how to set up a small hydroponic system at home, what equipment you’ll need, where to place it, and how to keep it running successfully.
What Is Hydroponics?
Hydroponics is a method of growing plants using water enriched with nutrients instead of soil. The plant roots sit directly in the nutrient solution or are supported by an inert growing medium like clay pebbles or coco coir.
Because nutrients are delivered straight to the roots, plants often grow faster, use less water, and produce higher yields compared to traditional soil gardening.
Why Choose a Small Hydroponic Kit?
A small hydroponic kit is ideal for beginners because:
-
-
- It’s easy to assemble
- Requires minimal space
- Uses less water than soil gardening
- Has fewer weeds and pests
- Can be used indoors year-round
-
Most small kits are designed for herbs, leafy greens, and compact vegetables like lettuce, spinach, Bok choy, and cherry tomatoes.
Step 1: Choose the Right Hydroponic System
For home use, these are the most popular beginner-friendly systems:
-
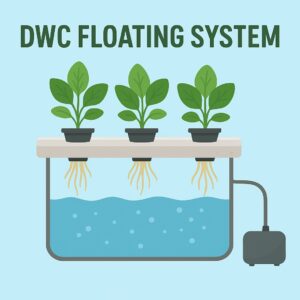 Deep Water Culture (DWC)
Plants sit in net pots with roots submerged in nutrient-rich water. An air pump provides oxygen.
Best for: Lettuce, herbs, fast-growing greens
Pros: Simple, low-cost, low maintenance
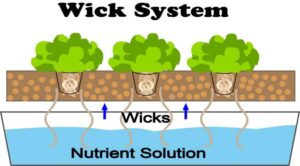 Wick System
Nutrients are drawn up to the roots through a wick.
Best for: Herbs and small plants
Pros: No electricity required
Cons: Slower growth
-
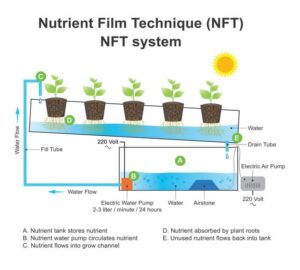 Nutrient Film Technique (NFT)
A thin stream of nutrient solution flows past the roots.
Best for: Herbs and leafy greens
Pros: Efficient and compact
Cons: Slightly more complex
For most beginners, a small DWC kit is the easiest and most forgiving option.
Step 2: Gather Your Equipment
Most hydroponic starter kits include everything you need. If not, here’s a basic checklist:
-
-
- Reservoir or container (food-grade plastic)
- Net pots
- Growing medium (clay pebbles or rockwool)
- Air pump and air stone (for DWC)
- Hydroponic nutrients (A & B solution)
- pH test kit or meter
- LED grow light (if indoors)
- Seeds or seedlings
-
Many compact kits are designed to sit on a kitchen bench or shelf and plug straight into a power point.
Step 3: Choose the Right Location
Location is crucial for success.
Light
-
-
- If near a bright window: 6–8 hours of sunlight daily
- Otherwise: use a full-spectrum LED grow light for 12–16 hours per day
-
Temperature
-
-
- Ideal range: 18–24°C
- Avoid placing systems near heaters or draughty windows
-
Accessibility
-
-
- You’ll need easy access for topping up water and checking plants
-
Step 4: Assemble the Kit
Follow the manufacturer’s instructions, but the general process is:
-
-
- Rinse the reservoir and components with clean water
- Insert the air stone and connect it to the air pump
- Fill the reservoir with water
- Add hydroponic nutrients according to the instructions
- Place net pots into the lid
- Insert growing medium and seeds or seedlings
-
Make sure roots will be able to reach the nutrient solution as they grow.
Step 5: Mix and Balance Nutrients
Hydroponic plants rely entirely on the nutrient solution.
Nutrient Strength
-
-
- Use nutrients specifically designed for hydroponics
- Follow label instructions carefully—more is not better
-
pH Level
-
-
- Ideal pH for most plants: 5–6.5
- Adjust using pH up or pH down solutions if needed
-
Check pH at least once a week to avoid nutrient lockout.
Step 6: Plant Your Seeds or Seedlings
Starting from Seed
-
-
- Use rockwool cubes or seed plugs
- Keep moist and warm until germination
- Transfer to net pots once roots appear
-
Using Seedlings
-
-
- Gently rinse soil from roots
- Place directly into the growing medium
-
Beginner-friendly plants include:
-
-
- Basil
- Mint
- Parsley
- Lettuce
- Spinach
- Pak choi
-
If starting from seed, your kit should include planting media or plugs to help seedlings sprout. Otherwise, gently clean soil from store-bought seedlings and plant them into your hydroponic system.
Step 7: Maintain Your System
Hydroponic systems are low-maintenance but not maintenance-free.
Daily
-
-
- Check the water level
- Ensure the air pump and lights are working
-
Weekly
-
-
- Top up with fresh water
- Check pH and nutrient strength
-
Every 2–3 Weeks
-
-
- Replace the nutrient solution completely
- Clean the reservoir if needed
-
Healthy hydroponic roots should be firm and white; brown or slimy roots can signal issues.
Common Beginner Mistakes to Avoid
-
-
- Overfeeding nutrients -Too much can shock [lants
- Ignoring pH levels – pH imbalances block nutrient uptake
- Letting the water temperature get too warm
- Using poor-quality lights – Plants need enough light for photosynthesis
- Growing plants too close together – Give each plant space to grow
-
Start small, keep things simple, and expand once you gain confidence.
Is Hydroponics Worth It?
Absolutely. A small hydroponic kit can provide fresh, chemical-free produce year-round with minimal effort. It’s clean, efficient, and surprisingly addictive once you see how fast plants grow.
Whether you want fresh herbs for cooking or a productive indoor garden, hydroponics is a smart and satisfying solution.
Final Thoughts on Setting Up a Small Hydroponic Kit at Home
Setting up a small hydroponic kit at home doesn’t require technical skills or a green thumb—just a little curiosity and consistency. With the right setup and a few minutes of care each week, you’ll be harvesting fresh produce in no time.
Happy growing! 🌿